
- Integrations
- ASP.NET Core 3.1
Integrations
ASP.NET Core 3.1
Accept MitID, Swedish BankID, Norwegian BankID and other eID logins with ASP.NET Core 3.1 and Criipto Verify
This tutorial demonstrates how to add user login to the existing ASP.NET Core 3.x application. If you are migrating .NET Core v2.x application to .NET Core v3.1, skip to the Migrate .NET Core v2.x sample to .NET Core v3.1 section.
Four steps are required to complete your first test login:
- Register your application in Criipto Verify
- Configure OAuth2 Code Flow
- Configure your application to use Criipto Verify
- Trigger authentication in your application
This explains how to set up your application and test with test users. To use real eIDs for login the setup is the same, but you must be set up for Production.
And note that you need test eID users to see your code in action. How to get those is described further down.
You may get a completed and ready to run sample from GitHub showing the below recipe in the simplest of ASP.NET Core MVC applications.
To modify your existing application to work with Criipto Verify follow the steps below.
Register Your Application in Criipto Verify
After you signed up for Criipto Verify, you must register an application before you can actually try logging in with any eID.
Once your application is registered, the dashboard will contain the necessary details to configure your application to communicate with Criipto Verify. You will need the following information from the General tab of your application settings:
- Client ID to identify you application to Criipto Verify.
- Domain on which you will be communicating with Criipto Verify.
Register callback URLs
Before you can start sending authentication requests to Criipto Verify you need to register the URLs on which you want to receive the returned JSON Web Token, JWT.
The Callback URL of your application is the URL where Criipto Verify will redirect to after the user has authenticated in order for the OpenID Connect ASP.NET middleware to complete the authentication process.
You will need to add these URLs to the list of allowed URLs for your application:
https://localhost:5001/callback
http://localhost:5000/callback
https://localhost:5001/signout
http://localhost:5000/signout
If you deploy your application to a different URL, you will need to add that URL to the Callback URLs as well.
Configure OAuth2 Code Flow
If you are registering a new application, please save the initial configuration first.
After saving, you can configure the OAuth2 Code Flow for this application by following the three steps:
- Go to the OpenID Connect section of your Application settings and Enable OAuth2 Code Flow.
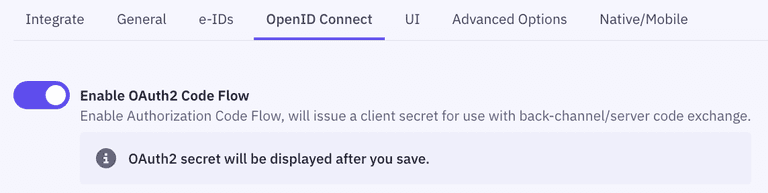
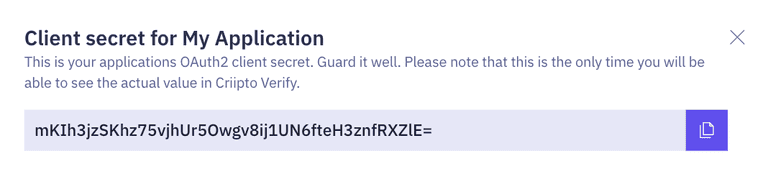
- Copy the generated client secret. Note that this is the only time you will be shown the actual value of the client secret. Criipto only stores this as a hashed value, which means you cannot retrieve the value once it has been generated and stored.
- Set the user info response strategy to
plainJsonto enable retrieval of plain JSON user information from the/oauth2/userinfoendpoint. Note that some libraries do not support the final
 userinforequest. In those cases, you will need to fetch the user data directly from thetokenendpoint as opposed to theuserinfoendpoint. You can do this by choosingfromTokenEndpointas aUser info response strategy.
Criipto Verify supports four modes for retrieving user information:
- Plain JSON object (
plainJson): User information is returned from theuserinfoendpoint as a standard JSON object. - Signed JWT (
signedJwt): User information is returned from theuserinfoendpoint as a digitally signed JSON Web Token. - Signed and encrypted JWT (
signedAndEncryptedJwt): User information is returned from theuserinfoendpoint as a signed and encrypted JSON Web Encryption(JWE) object. - Directly from the
tokenendpoint, embedded in theid_token(fromTokenEndpoint). ThefromTokenEndpointflow is not standard, but can be useful if you are working with a product that does not call theuserinfoendpoint.
Install dependencies
To integrate Criipto Verify with ASP.NET Core you will use the Cookie and OpenID Connect (OIDC) authentication handlers. The seed project already references the ASP.NET Core meta package (Microsoft.AspNetCore.App) which includes all NuGet packages shipped by Microsoft as part of ASP.NET Core 3.1, including the packages for the Cookie and OIDC authentication handlers.
If you are adding this to your own existing project, and you have not referenced the meta package, then please make sure that you add the Microsoft.AspNetCore.Authentication.Cookies and Microsoft.AspNetCore.Authentication.OpenIdConnect packages to your application.
dotnet add package Microsoft.AspNetCore.Authentication.Cookies
dotnet add package Microsoft.AspNetCore.Authentication.OpenIdConnect
Configure OpenID Connect Middleware
To enable authentication in your ASP.NET Core application, use the OpenID Connect (OIDC) middleware.
Go to the ConfigureServices method of your Startup class. To add the authentication services, call the AddAuthentication method. To enable cookie authentication, call the AddCookie method.
Next, configure the OIDC authentication handler. Add a call to AddOpenIdConnect. Configure the necessary parameters, such as ClientId, ClientSecret, ResponseType, and not least the Authority. The latter is used by the middleware to get the metadata describing the relevant endpoints, the signing keys etc.
The OIDC middleware requests both the openid and profile scopes by default, but note that Criipto Verify by nature returns only the information derived from the underlying eID service. Changing the scopes does not affect the amount and nature of information delivered from the user information endpoint.
// Startup.cs

public void ConfigureServices(IServiceCollection services)
{
    services.Configure<CookiePolicyOptions>(options =>
    {
        // This lambda determines whether user consent for non-essential cookies is needed for a given request.
        options.CheckConsentNeeded = context => true;
        options.MinimumSameSitePolicy = SameSiteMode.None;
    });

    services.AddAuthentication(options => {
        options.DefaultScheme = CookieAuthenticationDefaults.AuthenticationScheme;
        options.DefaultChallengeScheme = OpenIdConnectDefaults.AuthenticationScheme;
    })
    .AddCookie()
    .AddOpenIdConnect(options => {
        options.ClientId = Configuration["Criipto:ClientId"]; // ClientID from application registration
        options.ClientSecret = Configuration["Criipto:ClientSecret"]; // Client secret from oauth2 code flow
        options.Authority = $"https://{Configuration["Criipto:Domain"]}/"; // Domain from application registration
        options.ResponseType = "code";

        // The next to settings must match the Callback URLs in Criipto Verify
        options.CallbackPath = new PathString("/callback");
        options.SignedOutCallbackPath = new PathString("/signout");

        // Hook up an event handler to set the acr_value of the authorize request
        // In a real world implementation this is probably a bit more flexible
        options.Events = new OpenIdConnectEvents() {
            OnRedirectToIdentityProvider = context => {
                context.ProtocolMessage.AcrValues = context.Request.Query["loginmethod"];
                return Task.FromResult(0);
            }
        };
    });

    services.AddMvc();
}
Note that the above code dynamically sets the AcrValues by picking it from the query string. In the general case, this may, of course, be set in other ways. Just note that it is dynamically set at the time of the actual login.
Choosing the specific login method
| Login method | acr_values | base64 encoded |
|---|---|---|
| Norwegian BankID | ||
| Mobile or Web (user choice): | urn:grn:authn:no:bankid | dXJuOmdybjphdXRobjpubzpiYW5raWQ= |
| BankID Biometrics (level substantial): | urn:grn:authn:no:bankid:substantial | dXJuOmdybjphdXRobjpubzpiYW5raWQ6c3Vic3RhbnRpYWw= |
| Norwegian Vipps Login | ||
| Login with Vipps app: | urn:grn:authn:no:vipps | dXJuOmdybjphdXRobjpubzp2aXBwcw== |
| Swedish BankID | ||
| All options (user chooses): | urn:grn:authn:se:bankid | dXJuOmdybjphdXRobjpzZTpiYW5raWQ= |
| Same device: | urn:grn:authn:se:bankid:same-device | dXJuOmdybjphdXRobjpzZTpiYW5raWQ6c2FtZS1kZXZpY2U= |
| Another device (aka mobile): | urn:grn:authn:se:bankid:another-device | dXJuOmdybjphdXRobjpzZTpiYW5raWQ6YW5vdGhlci1kZXZpY2U= |
| QR code: | urn:grn:authn:se:bankid:another-device:qr | dXJuOmdybjphdXRobjpzZTpiYW5raWQ6YW5vdGhlci1kZXZpY2U6cXI= |
| Danish MitID | ||
| Level low: | urn:grn:authn:dk:mitid:low | dXJuOmdybjphdXRobjpkazptaXRpZDpsb3c= |
| Level substantial: | urn:grn:authn:dk:mitid:substantial | dXJuOmdybjphdXRobjpkazptaXRpZDpzdWJzdGFudGlhbA== |
| MitID Erhverv (MitID Business): | urn:grn:authn:dk:mitid:business | dXJuOmdybjphdXRobjpkazptaXRpZDpidXNpbmVzcw== |
| Finnish Trust Network | ||
| BankID: | urn:grn:authn:fi:bankid | dXJuOmdybjphdXRobjpmaTpiYW5raWQ= |
| Mobile certificate (Mobiilivarmenne): | urn:grn:authn:fi:mobile-id | dXJuOmdybjphdXRobjpmaTptb2JpbGUtaWQ= |
| Both of the above: | urn:grn:authn:fi:all | dXJuOmdybjphdXRobjpmaTphbGw= |
| Itsme | ||
| Basic: | urn:grn:authn:itsme:basic | dXJuOmdybjphdXRobjppdHNtZTpiYXNpYw== |
| Advanced: | urn:grn:authn:itsme:advanced | dXJuOmdybjphdXRobjppdHNtZTphZHZhbmNlZA== |
| Belgium | ||
| Verified e-ID: | urn:grn:authn:be:eid:verified | dXJuOmdybjphdXRobjpiZTplaWQ6dmVyaWZpZWQ= |
Enable the OpenID Connect middleware
Next, add the authentication middleware. In the Configure method of the Startup class, call the UseAuthentication and UseAuthorization method. Make sure to call UseAuthentication method before UseAuthorization method, but both after UseRouting method.
// Startup.cs

public void Configure(IApplicationBuilder app, IWebHostEnvironment env)
{
    if (env.IsDevelopment())
    {
        app.UseDeveloperExceptionPage();
    }
    else
    {
        app.UseExceptionHandler("/Home/Error");
        // The default HSTS value is 30 days. You may want to change this for production scenarios, see https://aka.ms/aspnetcore-hsts.
        app.UseHsts();
    }

    app.UseHttpsRedirection();
    app.UseStaticFiles();
    app.UseCookiePolicy();

    app.UseRouting();

    app.UseAuthentication();
    app.UseAuthorization();


    app.UseEndpoints(routes =>
    {
        routes.MapControllerRoute("default", "{controller=Home}/{action=Index}/{id?}");
    });
}
Trigger Login and Logout in Your Application
After the middleware for performing the authentication is wired up, the next step is to perform the actual authentication.
Protected resources trigger login
One way to trigger the authentication flow is to tag routes in ASP.NET MVC with the Authorize. This is a way of telling the framework to only allow requests from authenticated users.
[Authorize] // If not already authenticated, this kicks off the process
public IActionResult Protected()
{
    return View();
}
Note that you may plug in your own Authorization handlers derived from Microsoft.AspNetCore.Authorization.AuthorizationHandler<TRequirement> to add additional guards beyond just authentication.
Explicit logout
Logout requires both terminating the local session by removing the cookies as well as telling Criipto Verify that the session is over.
public async Task Logout()
{
    // Call the server to terminate the session
    await HttpContext.SignOutAsync(OpenIdConnectDefaults.AuthenticationScheme);

    // Remove authnetication cookies
    await HttpContext.SignOutAsync(CookieAuthenticationDefaults.AuthenticationScheme);
}
Test users
Almost all eID types have a notion of test users and real users.
Real users are real people logging in to a web site, thus voluntering their real name and typically also a social security number, SSN.
Test users are either created by you for the occasion, or we provide you with access to already created test users.
You may read more in the section on eIDs
The runtime flow
In summary, the steps above will lead to a runtime flow that looks like this:
- The web server starts the application, which configures and initializes the OpenID Connect middleware. The middleware is configured with a URL from which it retrieves the metadata describing the various endpoints (e.g.,
tokenanduserinfo) and encryption keys, as well as the token signing certificates. - The user picks the login method, or the application is hardcoded to use one of the authentication options.
- A request for a resource protected by the
[Authorization]kicks off the OIDC middleware login flow. - The user's browser is redirected to the Criipto Verify service, where the actual login takes place.
- A callback with an issued authorization code is sent back to the application and intercepted by the OIDC middleware.
- The middleware calls the Criipto Verify service to exchange the code for an access token. Note that this is a direct server-to-server call which, unlike the other communication, does not pass through the browser.
- The access token is used by the OIDC middleware to retrieve the available user information, which is set as claims on the user principal.
If you want to inspect the runtime flow, the browser's developer tools (e.g., in Chrome) can be used to examine the network traffic.
Setting up for Production
Once you have integrated with Criipto Verify and tested that it works with test user accounts, you are ready to go to production to accept real eID logins and signatures.
Please note that for production usage a paid subscription is required.
Read more in the section on how to set up for production.
Migrate ASP.NET Core v2.x sample to v3.x
This section demonstrates how to migrate ASP.NET Core v2.x sample from GitHub to ASP.NET Core v3.1
Before proceeding, make sure you have the appropriate ASP.NET Core 3.1 SDK.
The following steps are required to complete your first test login:
Modify aspnetcore-oidc project file
- Change the
TargetFrameworkfromnetcoreapp2.2tonetcoreapp3.1. - Remove the following line from the
PropertyGroup
<AspNetCoreHostingModel>InProcess</AspNetCoreHostingModel>
- Remove following
PackageReferenceentries fromItemGroup
  <PackageReference Include="Microsoft.AspNetCore.App" />
  <PackageReference Include="Microsoft.AspNetCore.Razor.Design" Version="2.2.0" PrivateAssets="All" />
- Add following
PackageReferenceentries to theItemGroup
  <PackageReference Include="Microsoft.AspNetCore.Authentication.Cookies" Version="2.2.0" />
  <PackageReference Include="Microsoft.AspNetCore.Authentication.OpenIdConnect" Version="3.1.1" />
Restore dependencies
Restore dependencies to make sure they are compatible with a new version of .NET Core.
Run the following command:
dotnet restore
Modify Startup.cs file
- In the
ConfigureServicesmethod, remove theSetCompatibilityVersionmethod. Change the line
services.AddMvc().SetCompatibilityVersion(CompatibilityVersion.Version_2_2);
into
services.AddMvc();
- In the
Configuremethod, change the second argument's type fromIHostingEnvironmenttoIWebHostEnvironment. - Add the following
using
using Microsoft.Extensions.Hosting;
- Add
app.UseRouting();beforeapp.UseAuthentication();. - Add
app.UseAuthorization();afterapp.UseAuthentication();. - Replace the following code from the
Configuremethod
  app.UseMvc(routes =>
  {
      routes.MapRoute(
          name: "default",
          template: "{controller=Home}/{action=Index}/{id?}");
  });
with
  app.UseEndpoints(routes =>
  {
      routes.MapControllerRoute("default", "{controller=Home}/{action=Index}/{id?}");
  });